You create a Google Search Console account by signing in to Search Console with a Google account and adding your website as a property. There is no separate registration form and no extra password, because the Google account you sign in with is your Search Console account, and it holds every property you have verified or been given access to, up to 1,000 of them. After adding the property you verify that you own the site, and from then on you can give other people access under Users and permissions. It is free, and it usually takes about ten minutes, most of which is waiting for a DNS record to go live.
What you need before you start
The only requirement on Google's side is a Google account. A Gmail address works, a Google Workspace address works, and Google also lets you create a Google account with an existing non-Gmail address, so a business can sign up with an address on its own domain. Choose the account with some care, because whoever controls it controls the property. For a company website, a shared or Workspace address that outlives any one employee is a safer home than someone's personal Gmail.
On the website side you need one way to prove that the site is yours. For a Domain property that means access to the DNS settings at your domain registrar or DNS host. For a URL-prefix property it is enough to be able to upload a file to the site, edit the homepage HTML, or use the site's Google Analytics or Google Tag Manager account.
Step 1: Sign in to Search Console with your Google account
Go to search.google.com/search-console and sign in with the Google account you picked. If your browser is signed in to several Google accounts, check the profile picture in the top right corner before you add anything, because the property ends up under whichever account is active. A new account has no properties yet, so Search Console asks you to add one straight away. Signing in later works the same way, and the guide on how to log into Google Search Console covers the usual problems, such as a property that seems to have disappeared.
Step 2: Add your website as a property
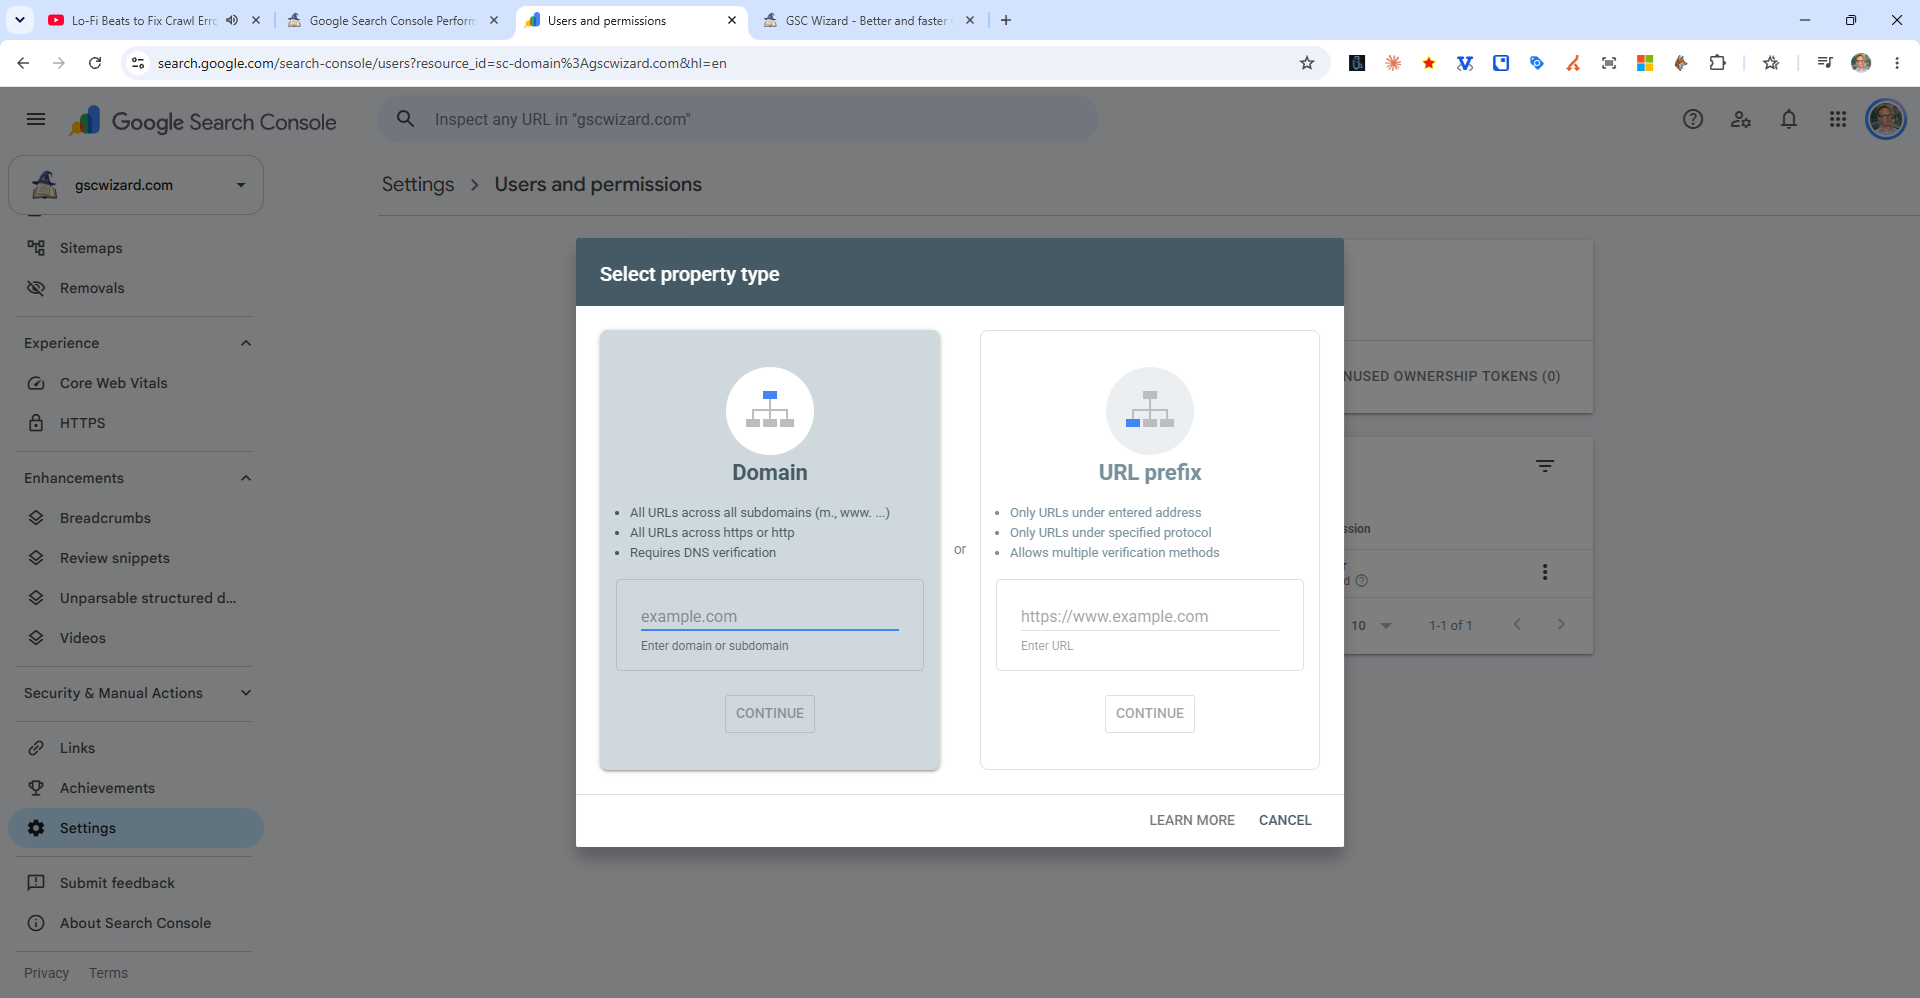
Open the property selector at the top left and choose Add property. Search Console then asks which property type you want:
- Domain covers the whole domain in one property, including every subdomain (www, m, shop and so on) and both http and https. You enter the bare domain, such as
example.com, and it can only be verified through DNS. - URL prefix covers only the URLs that start with exactly the address you enter, such as
https://www.example.com/. It offers more verification methods, but http and https, or www and non-www, each become a property of their own.
I recommend a Domain property whenever you can edit DNS, because it shows all of the site's search traffic in one place, and you can still add URL-prefix properties for single sections later. The differences are explained in Domain property vs URL prefix, and the click-by-click version of this step is in how to add a website to Google Search Console.
Step 3: Verify that you own the site
Search Console shows the verification options as soon as you add the property. For a Domain property it gives you a TXT record that starts with google-site-verification=, which you add at your DNS provider before clicking Verify. For a URL-prefix property you can choose an HTML file upload, an HTML tag on the homepage, your Google Analytics tracking code, your Google Tag Manager container or a DNS record, and Google's help notes that verifying a URL-prefix property through DNS verifies you for the Domain property as well. When a new DNS record is slow to appear, choose Verify later and come back once it is live.
Leave the token where it is after verification succeeds. Google keeps checking it, and its help says plainly that removing the DNS record or the verification file means losing the verification. Google starts collecting data for a property as soon as anyone adds it, even before verification, so the first Performance figures usually appear within a few days. Every method is explained step by step in how to verify Google Search Console.
Step 4: Add users and set permissions
An owner can give other Google accounts access under Settings > Users and permissions > Add user, as an Owner, a Full user or a Restricted user. Owners manage users and settings, full users see all the data and can take most actions, and restricted users can mostly look. The person you add does not have to accept an invitation, because access works straight away for the Google account you enter. The steps are in how to add a user in Google Search Console, and what each level may do is in Search Console permissions explained and owner vs user.
Add a second owner early. Google's help says that when all verified owners are removed, every other user loses access after a grace period, which is a common way for a company to lose access to its Search Console data once the agency or employee who set it up moves on. Several people can verify the same property, with the same method or different ones, as long as nobody overwrites another owner's token.
Step 5: Add your sitemap
With the property verified, the next useful step is to open Indexing > Sitemaps and add your sitemap URL, so Google finds every page you want in its index. The guide on how to add or upload a sitemap lists the usual sitemap addresses for WordPress, Shopify and other platforms.
Does a Search Console account cost anything?
No. Search Console is free and has no paid tier, and one Google account can hold up to 1,000 properties. The limits lie elsewhere: Search Console keeps 16 months of performance data, and its interface exports at most 1,000 rows per table. Is Google Search Console free? goes through what is and is not included.
Using your Search Console account in other tools
Tools that read Search Console data, such as Looker Studio or GSC Wizard, never ask for a separate Search Console login. They ask the Google account that has access to your properties for permission to read them. In GSC Wizard you sign in with Google and approve read-only access to Search Console, after which every property that Google account can see is available to add. I keep the data beyond Google's 16 months and turn it into reports, which is a paid service with a 7-day free trial, while Search Console itself stays free.
Frequently asked questions
Do I need a Gmail address to create a Google Search Console account?
No. Any Google account works, including a Google Workspace account or a Google account created with an existing non-Gmail email address, such as an address on your own domain.
Is a Google Search Console account free?
Yes. Search Console has no paid tier. All you need is a Google account and a website you can verify.
How many websites can one Search Console account have?
Google allows up to 1,000 properties in one Search Console account. A Domain property counts as one property, however many subdomains it covers.
Can I get access to Search Console without verifying the site myself?
Yes. An owner of the property can add your Google account under Settings > Users and permissions as an owner, full user or restricted user. The property then appears in your property selector without any verification on your side.
What happens to the Search Console account when the person who set it up leaves?
If that person was the only verified owner and their verification token is removed, all other users lose access after a grace period, although Google keeps collecting data for the property. Verify the property again with your own token, such as a DNS record or an HTML file, to become a verified owner, then remove the old owner under Users and permissions and delete their token.
How do I log into my Google Search Console account?
Go to search.google.com/search-console and sign in with the Google account that verified the property or was added as a user. There is no separate Search Console password.
Sources
- Search Console Help: Add a website property
- Search Console Help: Verify your site ownership
- Search Console Help: Managing owners, users, and permissions
- Google Account Help: Create a Google Account